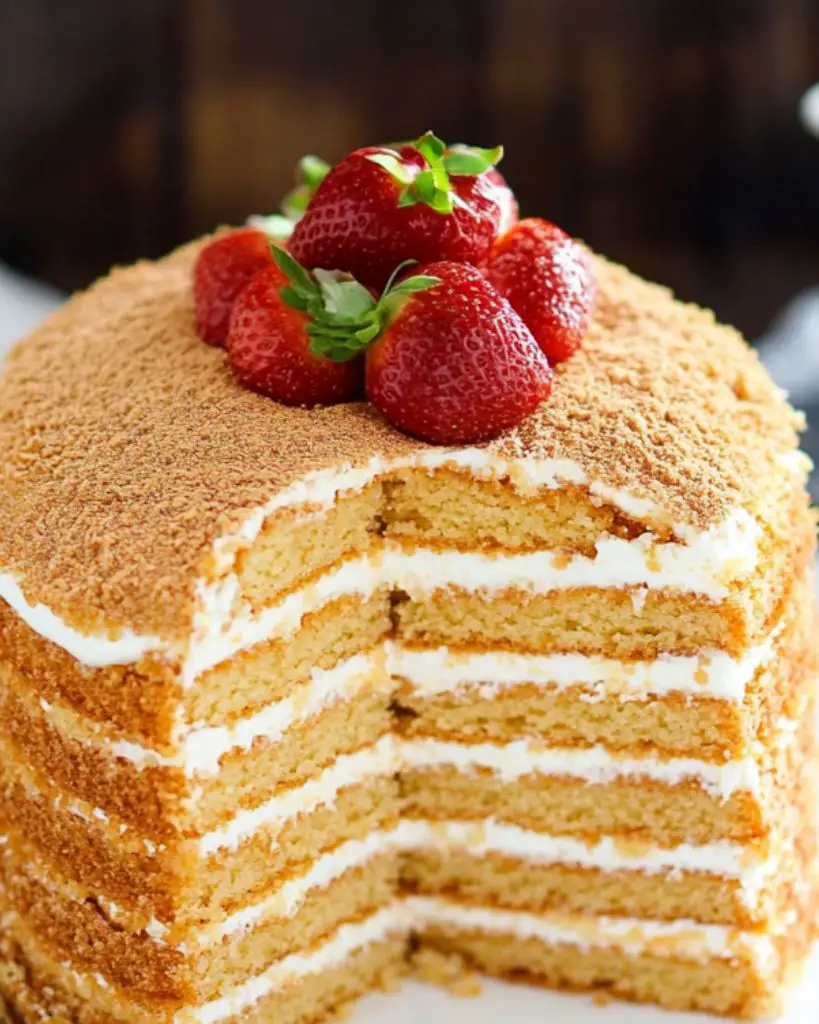
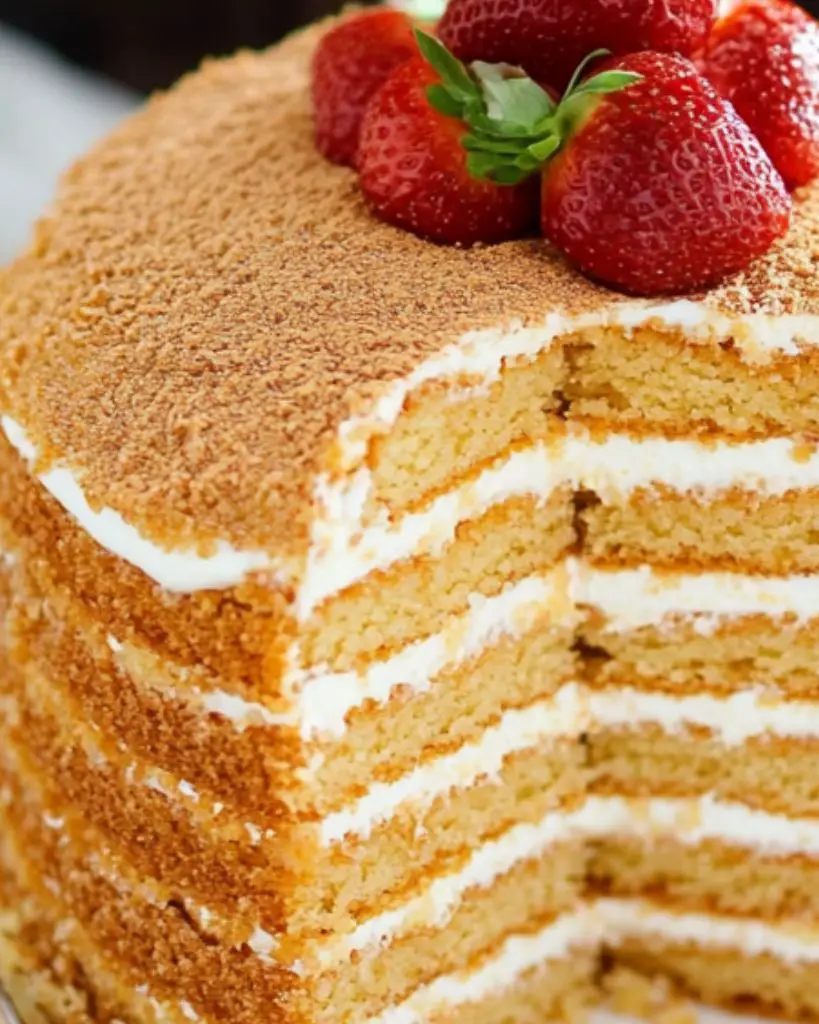
“Make a delicious 8-Layer Honey Cake (Medovik) from scratch with this easy recipe. Featuring soft honey-infused cake layers and a rich sour cream frosting, this Russian dessert is a showstopper at any occasion. Perfect for birthdays, holidays, or family gatherings, this cake is made with simple ingredients like honey, sour cream, and whipped cream. The multi-layered texture becomes even more delectable as it sets, offering a perfect balance of sweetness and creaminess. Impress your guests with this traditional dessert, sure to become a favorite in your recipe collection.”
Ingredients:
For the Cake Layers:
- 4 tbsp honey (1/4 cup)
- 3/4 cup granulated sugar
- 2 tbsp unsalted butter
- 3 large eggs, room temperature, beaten
- 1 tsp baking soda
- 3 cups all-purpose flour (unbleached, organic preferred)
For the Sour Cream Frosting:
- 32 oz sour cream
- 2 cups powdered sugar
- 1 cup heavy whipping cream
For the Topping:
- 1/2 lb strawberries (optional)
Instructions:
Making the Cake Layers:
- In a medium saucepan over medium-low heat, combine the sugar, honey, and butter. Stir occasionally until the sugar has dissolved, about 5-7 minutes. Be careful not to let it scorch.
- Once the sugar has melted, remove from heat. While the mixture is still warm, slowly add the beaten eggs in a steady stream while whisking vigorously. Whisk constantly to avoid scrambling the eggs.
- Stir in the baking soda until smooth, then gradually fold in the flour, 1/2 cup at a time, using a spatula until the dough reaches a clay-like consistency and doesn’t stick to your hands. This will require precisely 3 cups of flour.
- Divide the dough into 8 equal portions. Roll each portion into a thin 9-inch circle (about 1/8 inch thick) on a well-floured surface. Sprinkle some flour on the dough to prevent sticking to the rolling pin.
- Use a 9-inch plate or the base of a springform pan to trace perfect circles on the dough with a pizza cutter. Transfer the dough circles to parchment paper and bake 2 at a time at 350°F for 4-5 minutes or until golden. Cool completely on a wire rack. Repeat with the remaining dough.
- Bake the dough scraps on the parchment paper. Once cooled and firm, crush the scraps using a rolling pin or pulse in a food processor to create fine crumbs.
Making the Frosting:
- Whip the heavy cream on high speed for 1-2 minutes until stiff peaks form.
- In a separate bowl, mix the sour cream and powdered sugar. Gently fold in the whipped cream until smooth. Refrigerate until ready to use.
Assembling the Cake:
- Spread about 1/3 cup of frosting on each cake layer, ensuring that the layers absorb some of the cream to become ultra-soft. Press down gently as you go to prevent air gaps between layers.
- Frost the top and sides of the assembled cake with the remaining frosting.
- Dust the top and sides of the cake with the crushed dough crumbs. Cover with plastic wrap and refrigerate overnight. This cake needs time to absorb the cream and soften, so be patient—it’s worth the wait!
Tips
- Eggs: Be sure the eggs are at room temperature to help them blend better into the honey mixture.
- Frosting: For extra richness, use full-fat sour cream.
- Chilling: Allow the cake to sit overnight in the fridge to absorb the frosting and become soft.
Variations and Substitutions
- Flavored Frosting: You can add a bit of vanilla extract or lemon zest to the sour cream frosting for a different flavor profile.
- Gluten-Free Version: Substitute the all-purpose flour with a gluten-free flour blend.
- Fruit Filling: You can add fresh berries, like raspberries or blackberries, between the layers for an extra burst of flavor.
FAQs
Can I make this cake ahead of time?
Yes, this cake is best made the day before serving, allowing it to set overnight in the fridge.
Can I freeze Medovik?
Yes, you can freeze the cake layers individually, wrapped tightly in plastic wrap, for up to 3 months. Thaw overnight in the fridge before assembling.
Serving Suggestions
- Serve this cake at special occasions like birthdays, holidays, or family gatherings.
- Pair it with a cup of hot tea or coffee for a delightful afternoon treat.
Why You’ll Love This Recipe
This 8-layer honey cake (Medovik) is a true showstopper. Its soft, honey-infused cake layers are complemented by a rich sour cream frosting, creating a melt-in-your-mouth dessert that’s both indulgent and light. The cake becomes even more delicious as it sits, allowing the flavors to meld and the texture to soften. It’s the perfect dessert to impress guests, and once you try it, you’ll want to make it again and again!

8-Layer Honey Cake (Medovik)
12
servings2
hours25
minutesIngredients
For the Cake Layers:
4 tbsp honey (1/4 cup)
3/4 cup granulated sugar
2 tbsp unsalted butter
3 large eggs, room temperature, beaten
1 tsp baking soda
3 cups all-purpose flour (unbleached, organic preferred)
For the Sour Cream Frosting:
32 oz sour cream
2 cups powdered sugar
1 cup heavy whipping cream
For the Topping:
1/2 lb strawberries (optional)
Directions
- Making the Cake Layers:
- In a medium saucepan over medium-low heat, combine the sugar, honey, and butter. Stir occasionally until the sugar has dissolved, about 5-7 minutes. Be careful not to let it scorch.
- Once the sugar has melted, remove from heat. While the mixture is still warm, slowly add the beaten eggs in a steady stream while whisking vigorously. Whisk constantly to avoid scrambling the eggs.
- Stir in the baking soda until smooth, then gradually fold in the flour, 1/2 cup at a time, using a spatula until the dough reaches a clay-like consistency and doesn’t stick to your hands. This will require precisely 3 cups of flour.
- Divide the dough into 8 equal portions. Roll each portion into a thin 9-inch circle (about 1/8 inch thick) on a well-floured surface. Sprinkle some flour on the dough to prevent sticking to the rolling pin.
- Use a 9-inch plate or the base of a springform pan to trace perfect circles on the dough with a pizza cutter. Transfer the dough circles to parchment paper and bake 2 at a time at 350°F for 4-5 minutes or until golden. Cool completely on a wire rack. Repeat with the remaining dough.
- Bake the dough scraps on the parchment paper. Once cooled and firm, crush the scraps using a rolling pin or pulse in a food processor to create fine crumbs.
- Making the Frosting:
- Whip the heavy cream on high speed for 1-2 minutes until stiff peaks form.
- In a separate bowl, mix the sour cream and powdered sugar. Gently fold in the whipped cream until smooth. Refrigerate until ready to use.
- Assembling the Cake:
- Spread about 1/3 cup of frosting on each cake layer, ensuring that the layers absorb some of the cream to become ultra-soft. Press down gently as you go to prevent air gaps between layers.
- Frost the top and sides of the assembled cake with the remaining frosting.
- Dust the top and sides of the cake with the crushed dough crumbs. Cover with plastic wrap and refrigerate overnight. This cake needs time to absorb the cream and soften, so be patient—it’s worth the wait!


Leave a Comment